 …
…
Pumpkin Carving Design Tips & Tricks
…
I draw my own designs and create my own patterns. I love the whole process; Pumpkin Carving is so much fun. But sometimes, trying to get your design or pattern onto the pumpkin for carving can be tedious. Let’s face it, nobody likes to sit there poking the little holes through the pattern into your pumpkin just to remove the pattern and not be able to tell what the heck your design is supposed to be.
…
Here is an easy tip for transferring your design pattern to your pumpkin!

…
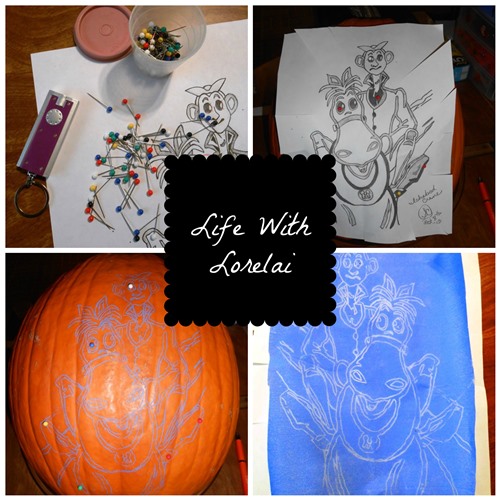
Saral Transfer Paper is the absolute easiest and best way to transfer your design to the pumpkin! I purchase mine by the roll for about $13 for 12 feet of paper from Art Supply Warehouse. Saral paper comes in many different colors. I use the blue paper because it shows up very nicely on the pumpkin.
…
…
How To Transfer the Design:
- Make a few copies of your pattern. This way you can use one to look at while carving, and you don’t destroy the only copy you have in case you or someone else would like to carve it again in the future.
… - Cut lines around your pattern so the paper will lay better across the surface of the pumpkin.
… - Cut Saral Transfer Paper to appropriate size for your design.
… - Use Pins (about 1/2″ to 3/4″ long) to hold the pattern to the pumpkin. Push the pins through blackened areas of your pattern (these areas will be cut out of your pattern so you will not see the pin marks). If there are any diseased spots or things you want off your pumpkin place a black area of your pattern over it so it will be cut out.
… - Tape the pattern in place with Masking Tape.
… - Trace your design with a Medium Point Pen (it doesn’t matter if there is ink). A medium point will not poke through the pattern as easily as a fine point pen. Be careful with the ridges of the pumpkin, make sure you are getting your design transferred down inside the ridges.
… - Once all lines have been traced, you can take the pattern off the pumpkin.
… - Check your design to be sure you transferred every detail. Did you miss anything? No problem, pin your pattern back to the pumpkin using the same holes and finish tracing. (This is also great if you need to stop in the middle of the transfer and put your pumpkin back in the refrigerator. Take your pattern off and then just replace it.)
… - Remove pattern from pumpkin.
…
…
Now, you have transferred your design pattern to your pumpkin. Yippee!
…
Next time, we’ll get the pumpkin ready to carve!
…
Have you ever transferred designs this way?
Do you have any tips or tricks?
…
You might ALSO LIKE:


…

SHARE THIS CONTEST!
…
Follow me on
…
I would love to hear from you … leave me a Comment. 
…
~Lorelai


This would make pumpkin carving design a breeze. I haven’t even gotten a pumpkin to carve yet.
Oh, it simplifies the transfer process so much! And, if you are doing multiple pumpkins, you can transfer your design ahead of time, which helps with time management! 🙂
Hi Lorelai. I haven’t carved a pumpkin in a very long time, but this sure looks like it would make it easier. Thanks for sharing. Hope you are having a great day!
OH, I hope you carve one this year, Regina… and enter it in my Pumpkin Carving Contest! 🙂 This really does make it a ton easier. 🙂
We’ll be carving this weekend. 🙂 Thanks for the timely tips, and I like your Halloween background on the blog.
Perfect timing! I hope you have a wonderful time with your carving. Take pictures and send them in for my Pumpkin Carving Contest! 🙂 I would love to see what you carve.
wow..what a cool DIY! I love it! I am not much of a creative person, so I don’t have any tips to share. But I welcome all the tips I can get my hands on lol…thanks for this 🙂
You are so welcome! I’m glad you liked this post. I hope you will be carving pumpkins and that these tips will help. 🙂
Oh my gosh…these are so beautiful!!! I would never be able to even attempt something so fancy!
You’d be surprised what you can do if you just have a little patience. Rory is not known for her patience in Pumpkin Carving, but wait until you see how her Ichabod Crane turned out… really cool! 🙂
Oh I can’t wait! i love Ichabod Crane!
I am a HUGE Legend of Sleepy Hollow fan! 🙂
Awesome tips. The Saral paper is a good product to know about, it could be used for lots of other things too.
Do you ever soak your finished pumpkins in clorox water to preserve them? Or how do you do it?
Saral paper is amazing for a lot of things. NO, I do not soak my pumpkins in bleach. I have a post coming up very soon on preserving or help making carved pumpkins last longer. Check back! 🙂
Haha, I’m with her, I haven’t even gotten a pumpkin yet! Do you draw your designs by hand or on the computer? Either way, they are beautiful, you are a true artist. I honestly did not know you could make a pattern and transfer it, very cool.
I draw them by hand… and thank you. I erase a lot! LOL
Using a pattern makes carving so much easier. I hope you will be entering the contest. Brady would love it! 🙂
I don’t know yet, but I just might 🙂
This looks so much better than what I do. I will be trying this out next weekend for sure.
Yeah, I’m so glad I could help! 🙂 Be sure to enter photos of your pumpkins in my Pumpkin Carving Contest! 🙂
We carved a pumpkin this year using a stencil and it worked out well. This looks like so much fun!
Woo Hoo! Enter a photo of your pumpkin in my Pumpkin Caring Contest! I would love to see it. 🙂
I am anxious to see how well the carving turned out. I bet it helped a lot. Carving pumpkins sure isn’t as easy as it sounds. My son and I are going to be carving soon. I can’t wait to see your results!
Have a great time carving with your son. Take pictures and enter my Pumpkin Carving Contest! 🙂
Transfer paper! Duh! So smart! We probably won’t carve this year, but next year I am all over this!
The Saral Transfer Paper makes the whole project so much easier. It really is a huge time saver. 🙂
Now this would make pumpkin carving easy instead of just eyeing it!
Much easier! I remember trying to do it by eye and by poking it… not good, but the transfer paper is genius! 🙂
I used tracing to transfer design, but definitely not with pumpkin. 😄as I don’t celebrate fall or halloween. Thanks for sharing.
The transfer paper has so many creative uses. I love it! 🙂
I wouldn’t have thought it would be quite that simple, so I’m glad you spelled it all out so well. You’re a smart cookie!
Isn’t it amazing how simple the transfer paper makes it? When I first saw it done, I was in awe. I could not go buy some fast enough! 🙂
Holy cow, this is brilliant! It’s so simple, but so brilliant! Why would you put your pumpkin back in the fridge? Are you supposed to keep it cold or something? Or is that just for if you have to leave (like you with your 15+ hours to carve a masterpiece) and you want to keep it fresh?
Yes, once the pumpkin is cut, you tie it in a plastic bag and put it in the fridge to preserve it. I will be explaining all about it in an upcoming post very shortly. 🙂
I don’t know when I saw last time a real pumpkin. We don’t celebrate Halloween around here, but I always watch from the sideline the crazy and fun things you guys do in the US for this event 🙂
We do have a great deal of fun with Halloween! 🙂
I’ve never been great with transfer paper, but this made it look doable. Thanks!
This is just tracing the lines of your pattern, it’s really very simple. 🙂
This post has committed me to carving a pumpkin! It has been a while…. Maybe I will get a little more ambitious than usual. This will be fun!! Thanks for the inspiration!!
You’re welcome! I hope you have a great time… and be sure to send in a photo for my Pumpkin Carving Contest. 🙂
This looks so much easier than taking that little poky tool and making holes all the way around the design! Awesome Lorelai! You rock!
This is WAY easier! Trace, carve, and have FUN! 🙂
Pingback: Pumpkin Carving – Gutting & Preserving Your Pumpkin | Life With Lorelai
Pingback: Pumpkin Carving Safety Tips | Kimberley Vassal Insurance Services, LTD.
Thank you for the Link Love! 🙂
Pingback: That’s a Wrap – Your Weekly Review | Regina At The Lake
Pingback: Gutting & Preserving Your Pumpkin | Pumpkin Carving